Posts tonen met het label trees. Alle posts tonen

woensdag 27 oktober 2021

Autumn birches


You need: 

  1. drawing sheets A3 size
  2. painters tape in several widths
  3. liquid watercolor paint in red, green and yellow in rood, geel en groen
  4. brushes
  5. tempera paint  
  6. stipple brush
  7. old shopping card/customer card
  8. saucers
  9. jars
Choose thick drawing paper,  to avoid ripping when you remove the tape . 

Look at birch trees. What do you see?   
 

  • straight trunks
  • trunks are white
  • horizontal peeling bark banden
  • autumn color leaves: orange, yellow, brown, red
What to do?

Step 1
Palce the sheet on the table with the narrow site down.  Stick strips of tape from top to bottom. Wide for the trunks, narrower for the branches. Note: branches grow up and not down. 


Step 2
Paint the background in strips with diluted liquid watercolor. Let dry. Peel off the tape carefully. 

Step 3
Put some black tempera paint on a saucer. Dip your customer card in the paint. Pull this in several places from left to right (or right to left!) to halfway up the trunk to make the black streaks.

  
Step 4
Spray som warm colors tempera + green on a saucer.  Stipple leaves at the top of the trees using the stipple brush. Do not mix the colors, but use several colors at the brush at the same time.  


Step 5
Hang up! 


Artworks are made by students of grade 1. 

zaterdag 21 november 2020

Winter tree in warm-cool colors

 You need:

  1. drawing sheets 25 x 32,5 cm
  2. crayons
  3. watercolor paint
  4. black tempera 
  5. brushes
  6. jar with water
With crayon: draw a horizonline and a tree trunk from the bottom of the sheet. Draw branches that touch the edges of the sheet. Draw a pattern in the landscape below the horizon. 
With watercolor paint: paint the sky. Paint the surfaces between the branches in warm or cool colors. Paint the surfaces in the landscape: warm if you first chose cool, cool if you first chose warm. 
With tempera: paint the branches and trunk black. 

Elements of art: color (warm and cool), space, line (pattern)

artworks made by students of grade 4

maandag 3 december 2018

Silver and white Xmas tree

Made by a student of grade 4

You need:
  1. green construction paper
  2. silver marker
  3. white pencil
Draw the trunk of a tree in the middle of a sheet, starting at the bottom and ending about 2 inches from the top. Color the trunk with silver marker. 
Draw lines from the trunk to the right and left. Don't use a ruler! The lines become shorter to create a triangle.  
Draw Xmas decorations on the branches using a white pencil. 

zondag 2 december 2018

Colourful Christmas trees


This lesson is seen more than 133,000 times. 
If you use it on your own website, please mention your source: kidsartists.blogspot.com
And if you want to make money out of this lesson, realise it's my work. 
So ask me before sending it to Teachers pay teachers, Twinkle and all that other sites. 

You need:
  1. two drawing sheets A4 size
  2. watercolour paint
  3. brushes
  4. jar with water
  5. tissue paper
  6. scissors
  7. glue
  8. ruler
  9. pencil
  10. gold or silver marker
  11. white correction marker
  12. glitter
Paint a background for the Christmas trees with water paint. Use different colours and let them blend into each other. Use plenty of water for nice bright colours.
Choose three colours of tissue paper. Fold the sheets several times and cut triangles and squares. Take a sheet of drawing paper and make it wet with a brush and water. Lay the pieces of tissue paper on this wet sheet. If the tissue paper is not wet enough, it won't bleed. Then make it wet again with a brush with water. Fill the sheet with these tissue paper parts and leave it to dry. Remove the pieces of tissue paper from the sheet when it is completely dry. The sheet will look like this:
Cut long triangles from the sheet that was coloured with tissue paper. You may use the schedule above (based on A4 size sheet of 21 by 29 cm - half cm will remain on both sides then). You can cut a piece from the bottom of the triangles if you want trees of various heights. Paste these three trees with overlap on the water paint background. Don't paste the trees all at the same height, so you get depth. Cut some smaller triangles from the left overs if you want more trees.
Outline the trees with silver or gold marker. Draw a simple branch structure. Draw the strains with brown pencil or use the metallic pins. Draw snowflakes around and on the trees with a white (correction) marker or use chips from the punch. rond en op de bomen. Paste the artwork on a coloured background. Sprinkle some glitter on the forest floor.
All artwork is made by students of 11-12 years old

donderdag 13 september 2018

Patterned trees collage

You need:
  1. white drawing sheet A3 size
  2. liquid water color paint
  3. brush
  4. construction paper in several colors
  5. scissors and glue
  6. black fine marker
Fold the sheet in two. Paint the upper half blue, the  lower half green. Leave the edges white. 
Cut several shapes from construction paper: ovals, 'clouds', circles.   
Use a fineliner to draw the trunk and fill the shapes with a variety of patterns.  
Paste the shapes on the painted sheet and be sure the shapes overlap each other to suggest depth.

maandag 14 november 2016

Moon behind tree

Made by a student of grade 6
You need:
  1. white drawing sheet 
  2. charcoal
  3. chalk pastels 
  4. indian ink
  5. brush 
Use a saucer to draw a moon in the center of the sheet. Colour it with yellow chalk pastel. Colour the rest of the sheet grey using charcoal: around the moon it's brighter than further away.
Draw a branch and paint it with Indian ink.

maandag 13 januari 2014

Patterned tree


Made by a student of grade 6
You need:
  1. drawing sheet 21 by 27 cm 
  2. ruler
  3. pencil
  4. colour pencils
  5. fine black marker 
Draw a grid from 3 by 3 cm. Trace a sourcer for a circle. Draw a tree and be sure the branches are within the cirle. Draw patterns in the the tree using a fine black marker. Colour the squares in the circle in warm colours and the other squares in cool colours. Be sure the difference between under and above the horizon line is visible.

Source: Tiny Artroom

dinsdag 12 november 2013

Autumn birches

Made by a student of grade 6

You need:
  1. drawing sheet
  2. masking tape
  3. tempera 
  4. stippling brushes
  5. charcoal
  6. chalk pastel 
See photos of birch trees and discuss the salient feautures : the long white stem, the gray black lines as a result of the horizontal peeling the bark, the many autumn colours of the leaves. Talk about the colours of the leaves on the floor: in front uou see a lot of different colours, and looking further away they merge into one colour.
Explain how to work with a stippling brush: no mixing colors, but put the brush in several colours at once and then stamp lightly. 

Paste from above a number of strips of masking tape on the sheet in various lengths. Draw a horizon line. Stamp the bottom in several autumn colours, merging into one colour near the horizon line. Stamp the remaining leaves in the trees. There may be green there too! Leave the artwork to dry and then colour the sky with chalk pastel. Pull the masking tape off carefully . Draw with charcoal the specific birch dashes .

maandag 10 december 2012

The Xmas tree isn't green


You need:
  1. two drawing sheets A4 size
  2. liquid watercolour paint
  3. brushes
  4. jar with water
  5. tissue paper
  6. scissors
  7. glue
  8. pencil
  9. gold or silver marker
Paint a background with liquid water colour paint. Use two dark colours and let them blend into each other, leaving some white on the sheet.
Choose three colours of tissue paper. Fold the sheets several times and cut triangles and squares. Take a white sheet and make it wet with a brush and water. Lay the pieces of tissue paper on the wet sheet. If the tissue paper is not wet enough, it won't bleed. If so, make it wet again with a brush with water. Fill the sheet with these tissue paper parts and leave it to dry. Remove the pieces of tissue paper when it is completely dry.

Artwork made by students of grade 4

Fold the tissue coloured sheet and cut triangles in several heights. Paste the trees on the background. Don't paste the trees all at the same height, so you get depth. Cut some smaller triangles from the left overs if you want more trees.
Outline the trees with silver or gold marker and draw a simple branch structure. Draw the trunks with a brown pencil.

dinsdag 23 oktober 2012

Four season trees

 
You need:
  1. four white drawing sheets A6 size (postcard)
  2. Q-tips
  3. tempera paint
  4. coloured corrugated cardboard
  5. silver and gold markers
  6. fiberfill
  7. glue
How can a deciduous tree tell you what season it is? What colours do they have in spring, summer and fall? What does a tree look like in winter?

Discuss these questions at the beginning of this lesson. Write on the board the colors in the spring heard (light green, green, white, pink - blossom), which belong to the summer (green, dark green, yellow) and the autumn colours (brown, orange, red, yellow). And in winter there aren't any leaves. left of course.

 
The students will make a tree for every season. The colours of the leaves have to show what season it is. The log is "painted" with a Q-tip, the leaves have to be may only be spotted. Remember that in fall there are a lot of leaves on the ground! Use fiberfill (snow) for the tree in winter.
 
Paste the trees next to each other on a piece of corrugated cardboard. Design it with gold or silver marker and write the seasons above the trees.  

Organisation:
Give each groep of six students an eggtray with several colours of paint. Give each student a Q-tip to paint the trunk. Per groep een eierdoos met de verschillende kleuren verf. Geef de leerlingen elk een wattenstaafje voor de boomstam.For the dots: one Q-tip per colour for common use.
 
Artworks made by students of grade 3
 
Thanks to Maureen Kaal

dinsdag 17 januari 2012

Winter forest prints


I found this lesson on Mrs. Knight's art class blog. Take a look on that blog to see more beautiful artworks.

You need:
  1. ribbed cardboard
  2. flat cardboard
  3. woodsies
  4. coloured construction paper
  5. block printing ink
  6. piece of plexiglass
  7. roller
Students make a collage of trees, cut from pieces of flat and ribbed cardboard and woodsies. Tell them the cardboard can be used in two ways: from top to bottom or from left to right.
Shake the bottle of blockprint carefully to be sure oil will mix with the rest. Drip some paint on the glass and roll it out. Roll the paint on the trees. Put a sheet on top of it and press firmly with a flat hand. Make different prints, choose the best one to paste on a coloured background.    

woensdag 16 februari 2011

Winter trees glimpse

Made by a student of grade 6

You need:
  1. cardboard in three colours, 15 by 20 cm
  2. ruler
  3. pencil
  4. cutter
  5. cutting mat
  6. double sided foamtape
  7. hook

Draw a rectangle on each sheet of cardboard 2 cm from the edges. Draw wintertrees in these rectangles. The trunk must be on the bottom, the branches must reach the left, right or upper edge. Make sure the three trunks slightly stagger. Cut the parts between the branches/trunk and the frame using a cutter. Use double sided foam tape to paste the three windows together. The lightest colour in the front, the darkest colour on the back.

Attach a hook to the window to hang it.

maandag 6 december 2010

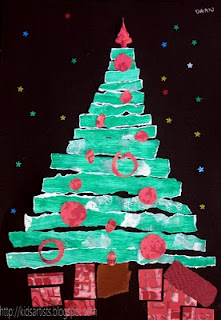
Christmas tree in strips

Made by a student of 11 years old

You need:
  1. white drawing sheet A4 size
  2. black construction paper A4 size
  3. tempera paint
  4. brush
  5. advertising leaflet with Christmas decorations or aluminum foil or scrapbooking paper
  6. glue
  7. glitter stars
  8. small piece of brown paper
Paint a white sheet with a broad brush and undiluted green tempera paint. Apply patches or streaks of different colours, to make the green sheet more vivid. Let the sheet dry.

Tear a trunk out of brown paper. Tear strips of the painted sheet that are about the same width. Place the paper strips on a black sheet in the form of a Christmas tree; the strips have to become slightly shorter. Put the trunk below the bottom strip and paste it. Paste the green strips, so that the trunk disappears partly under the lower strip.

Cut balls and a peak out of aluminium foil or advertising leaflets. You can also use scrapbooking paper. Paste balls and peak on the tree. Cut squares and rectangles (presents!) of coloured paper and paste them under the tree. Paste glitter stars around the tree.

maandag 19 juli 2010

Tree of life, like Gustav Klimt

You need:

  1. black construction paper A4 size
  2. thick gold marker papier
  3. fine gel pens in metallic colours

Gustav Klimt (Austria, 1862 – 1918) was born near Vienna in a poor family. His father was was a gold engraver. This may have influenced Klimt in his use of gold in his paintings. In 1876, Klimt was awarded a scholarship to the Vienna School of Arts and Crafts . His work consists of paintings of mostly women, but also wallpaintings , drawings and collages. Klimt is much praised for the use of gold in his paintings.

Show some artwork of Klimt, and especially the painting 'Tree of life'. Discuss the distinctive features in the work: use of gold colour, the spiral branches, the bird, circles that look like eyes. Tell students about the symbolic significance of these motifs: the tree of life curls, just like in paradise, in all directions. On the lush branches grow flowers with eyes of wisdom and the paradise bird underlines the enchanting impact.

Give students a black construction paper. Let them draw the trunk of a tree that leads to curling branches. Fill the whole sheet with branches, of choose, just like the artwork above, a round shape. Fill the spaces between the branches with different patterns in metallic-coloured gel pens or markers.

Both artworks are made by students of 12 years old

zaterdag 6 februari 2010

Winter through my window

Made by Silke, 10 years old

You need:

  1. brown paper strips from 2 cm wide
  2. light blue drawing paper
  3. oil pastel
  4. tempera paint
  5. brushes
  6. glue
Draw a winter tree and a fence that gets smaller in the distance. Colour tree and fence with oilpastels. Paint snow on the ground, the tree and the fence using white tempera paint. Paste the brown strips on the drawing as if it's a window frame.

zondag 3 januari 2010

Trees in the snow

Made by Kiki, 11 years old
You need:
  1. blue cardboard
  2. oil pastels
  3. glitter
  4. glue

Look what trees look like in winter: no leaves, just the trunk and branches. The trunk is wide and runs smaller to the top. Branches are getting smaller to the top also. Children sketch with pencil one or two trees. The trees have to be coloured with oil pastels. Use more colours then just brown: with black, green or blue you can suggest texture in the trunk. Colour snow on the branches with white oil pastels. Of course there will be no snow hanging below the branches, it would fall down!
Use glitter to light up the snow.

dinsdag 29 december 2009

Winter scene

Made by Veerle, 10 years old
You need:
  1. black paper A4 size
  2. chalk pastels
  3. hairspray
  4. scissors
  5. glitter
  6. glue
Students draw a winter forest with snowy pine trees on a black background. The trees on the foreground must be lighter than those on the background.

When ready, put a flower pot on the drawing and draw a circle. Cut this circle. Fix your artwork with hairspray and let it dry for a few seconds. Then lay the circle face down on the table. Colour along the outer edge of the back of the circle a circle of about one centimeter. Put the circle in the middle of a new sheet of black paper. Smudge the chalk with your fingers on the new sheet, taking care the work won't move. Finally turn the circle and paste it in the black circle of your latest sheet. Sprinkle a little glitter in small dots of glue.

woensdag 16 december 2009

Polish folkart Christmas tree

You need:
  1. white, red and green sheet A4 size
  2. scissors
  3. glue

Put the red and white sheet together and fold them. Draw half a Christmas tree against the fold and cut it out. Take the white tree and fold it again. Cut some of the edges and cut patterns from the fold towards the edges (just like snowflakes). Glue the white tree on the red one and glue the complete tree on a green sheet.

maandag 14 december 2009

Christmas trees collage

By Silke, 10 years old
I found this idea on Artsonia a collage of Christmas trees coloured with different materials on music paper. You need:
  1. white drawing paper A4 size
  2. different colouring materials, like crayons, oilpastel, watercolour paint, tempera, colour pencils, markers, aquarelle pencils etc.
  3. music paper
  4. chalk pastel
  5. green paper for background
  6. scissors
  7. glue
  8. black marker
Divide different colour materials in your classroom. One place with paint (water paint and tempera paint), one place with crayons and oil pastel, one place with pencils and markers. Children draw three overlapping triangles on a white sheet, the Christmas trees. These trees have to be coloured with different materials and patterns. The only colour they may use is green, in all its nuances. To colour, children have to take place at the table where the material of their choice is. When finished, the trees and patterns have to be outlined with a black marker. The trees (with the black outline) must be cut out. Then kids have to tear pieces of music paper and paste them on a new white sheet. Colour the background with light blue chalk pastel. Do not colour the music paper, just rub the edges with the chalk pastel. Paste the trees on the blue sheet and paste this work on a green background.

This work can also be done as a group work. All trees (or groups of trees) have to be glued then on a large background of music paper.

By children of 10-11 years old

woensdag 9 december 2009

Cubist Christmas tree

You need:
  1. white drawing sheet A4 size
  2. ruler
  3. tempera paint
  4. brushes
  5. gold and silver marker
Children draw a simplified Christmas tree: a big triangle. Measure it from the middle line. After this, draw lines across the drawing sheet: from top to bottom, from left to right, from top or bottom to the sides etc.
The tree has to be painted with different green colours (mix them!). The background has to be painted with warm mixed colours. If dry, the lines in the tree have to be drawn with a silver marker, the lines from the background with a gold marker.