Posts tonen met het label pop art. Alle posts tonen

donderdag 25 mei 2023

Selfportrait like Roy Lichtenstein

At our school it's customary to keep artwork at school until the of the school year. Students make a portfolio in june to take their work home. 
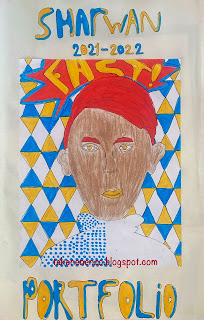
On front of it is a drawing in the style of one of the art movements we studied that year. In 2021-2022 it was pop art. 
These are the grade 6 portfolio folders with a self portrait in the style of Roy Lichtenstein. 

You need: 
For the folder: paper A1 size, folded in half
For the drawing

  1. white drawing paper A4 size 
  2. markers
  3. skin color pencils 
  4. fine marker in black
Show artwork of Lichtenstein and discuss the important features: use of primary colors (sometimes with green), grid dots, black outlines, speech bubbles and slogans (onomatopoeia).

contents portfolio folder grade 6

How?
  1. Draw a self portrait on the small sheet. 
  2. Add a text in a speech bubble that suits you. 
  3. Color your face using skin color pencils. Use markers for the rest of your drawing. 
  4. Fill one part of your drawing with dots. 
  5. Fill the background with a pattern. 
  6. Outline everything with a black marker. 
  7. Past e your work on the large sheet. 
  8. Draw in large letters: portfolio + you name + the school year. 

all artworks are made by students of grade 6

    donderdag 22 oktober 2020

    Keith Haring figures on tissue paper

    made by students of grade 3

    You need:
    1. colored tissuepaper
    2. white drawing sheet
    3. jar with water
    4. brush
    5. scissors
    6. templates of Haring figures
    7. pencil
    8. black marker

    Choose 2 or more colors of tissuepaper. Fold them in 16 squares. Cut out. 
    Take a sheet of drawing paper, make it wet with a brush and water. Lay the pieces of tissue paper on this wet sheet and see how they bleed. Fill the whole sheet and be sure to use enough water. 
    Let dry and remove the tissue papers. 
    Cut two or more Haring templates and outline them with a pencil. Trace those lines with black marker and trace them again to make nice bold lines. 

    zondag 18 oktober 2020

    In 'The Factory' of Andy Warhol

    made by students of grade 1

    You need: 

    1. colored paper 12 by 12 cm
    2. black construction paper 50 cm by 15 cm 
    3. tempera paint
    4. brushes
    5. apples
    6. glue
    7. black marker 

    Tell about Andy Warhol's Factory. 

    First lesson: "We are going to work today in the factory of Andy Warhol. Choose four colored sheets. Make apple prints in complementary colors: on a blue sheet you print an orange apple, on a red sheet you print a green apple etc."

    Let dry and paste the colored sheets on black construction paper.

    Second lesson: make a second print in a complementary color: on the orange apple you print a blue one etc. Let dry. Outline the apples with a black marker and add seeds and stem. 


    zondag 27 september 2020

    Pumpkin, like Burton Morris


     You need:

    1. several colors construction paper
    2. black cardboard 20 by 20 cm
    3. colored cardboard 20 by 20 cm
    4. scissors
    5. glue
    6. black marker
    Burton Morris (Pittsburgh, 1964) is an American pop-art artist. He is influenced by pop-art artists from the 60's and 70's, like Warhol, Lichtenstein and Haring. Now he is one of the most famous modern post pop-art artist. Morris's work shows a contemporary twist to traditional pop-art. His work is cheerful, energetic and colourful. His characteristic lines with the bright colors give his work a fantastic energy. Morris's work is known of tv-series like Friends and also appears in major advertising campaigns by U.S. companies like AT & T, Pepsi and Heinz. 

    To see a step by step description with photos', see my other post about Burton Morris

    And read the mail I got from Burton Morris when he came across my lesson of 2011: 

    Dear Jacquelin,

    I came across your blog and saw your student's artworks. I am truly touched that you honored my artwork in your teaching lessons and hope it was a success and inspired the children! 

    I hope to show again in the Netherlands one day and feel free to keep in touch.

    Your friend,
    Burton Morris

    maandag 7 september 2020

    The flowers of Andy Warhol


    You need:
    1. black construction paper A4 size
    2. brushes
    3. tempera paint
    4. scraps of colored paper
    5. scissors 
    6. glue
    Andy Warhol - popart
    Andy Warhol (1928-1897) was an American painter, photographer and filmaker. He started his working life as an advertising artist and became an artist in the early 1960's. He
     introduced everyday consumer products into his artwork, such as Campbell's soup cans and Coco Cola bottles. 

    Warhol is one of the leading artists of Pop art. 
    Using printing techniques he created large series of works of Marilyn Monroe or political themes such as the electric chair. Warhol used photographs of others to edit.
    The Flowers series clearly show how Warhol applied the silkscreen printing technique. We see the flowers of the rare Hibiscus fragilus.  
    The Flowers series are also seen as Warhol's answer toe Van Gogh's famous paintings of sunflowers and Claude Monet's artworks of water lilies. 

    Stamp green and yellow tempera on a black sheet of paper leaving about one inch of the edges black. Let dry. 
    Cut at least four flowers with five petals from scraps of colored paper. Do not draw in first, but cut by hand. Stick the flowers on the black sheet. No overlap. 

    Elements of art: shape, color

    woensdag 12 augustus 2020

    Life-size Keith Haring groupwork


    Show Haring's works and discuss them: 
    • comic like people
    • few details
    • thick black outlines
    • bright colors
    • dashes that indicate movement 
    You need:
    1. life-size drawing sheets.
    2. tempera paint
    3. brushes grote vellen schetspapier 
    Paste drawing sheets together. There must fit a child on it. 
    Make groups of 4 students. Trace one student of each group using a black marker.


     Students paint the traced figure in one color. Fill the rest of the sheet with patterns in black paint. 


    donderdag 13 juni 2019

    Where Keith Haring meets Piet Mondriaan


    You need:
    1. drawing sheet A2 size
    2. black strips 1,5 cm wide
    3. colored construction paper in red, yellow and blue
    4. ruler
    5. scissors
    6. glue
    7. black marker
    This is a teamwork lesson for two students. 

    Draw squares and rectangles of various sizes on the colored paper. Make sure they are straight: start from a right angle and measure carefully. Cut the squares and rectangles and spread them on the white sheet.  Make sure same colors do not touch each other and stick them. 
    Continue with the black strips. Decide by yourself how many strips and where you want them, but there are four requirements:
    • the strips must be sticked straight! (use your ruler)
    • black strips must be sticked around all colored area's
    • use the black strips to create white area's (squares and rectangles) 
    • don't use to much glue. Let some strips stay loose so you can put a Haring figure behind it
    Draw three or more Keith Haring  characters on the colored paper. Cut them and paste them on the Mondriaan sheet. Be sure there is no yellow character on a yellow area. 
    Outline the characters with a black marker and draw some 'move stripes' around them.

    zaterdag 9 februari 2019

    Popart like Burton Morris

    You need:
    1. several colours construction paper
    2. black cardboard 20 by 20 cm
    3. coloured cardboard 20 by 20 cm
    4. scissors
    5. glue
    6. black thick marker
    During our USA trip in the summer of 2009, I visited in the Coca-Cola Company in Atlanta, There I saw the artwork of Burton Morris for the first time: five paintings of cola bottles in pop-art style surrounded by light blue bubbles. So beautiful! Now I found a way to do this in school. And I think I'm the first blogger with a Morris lesson!
    Burton Morris (Pittsburgh, 1964) is an American pop-art artist. He is influenced by pop-art artists from the 60's and 70's, like Warhol, Lichtenstein and Haring. Now he is one of the most famous modern post pop-art artist. Morris's work shows a contemporary twist to traditional pop-art. His work is cheerful, energetic and colourful. His characteristic lines with the bright colours give his work a fantastic energy. Morris's work is known of tv-series like Friends and also appears in major advertising campaigns by U.S. companies like AT & T, Pepsi and Heinz.
    Show artwork of Morris on the digital board. Discuss the features: bright colours, black outlines, little detail, movement by little lines, white lines that suggest light and the distinctive black star shape around or in much of his work. Students are going to make an artwork in the style of Burton Morris with the subject: Valentine's Day.
    Step 1. Take two colours cardboard: black for the edge and one colour for the background. take a construction paper for the big heart.
    Step 2. Cut the edges of the background cardboard sloping away, to make a sort of rug. You have to cut at least 1 cm around.
    Step 3. Cut a large heart from the second coloured cardboard. Cut white 'light lines' from a white sheet for on and around the big heart.
    Step 4. Cut some smaller hearts from several colours of construction paper. Cut white 'light lines' and paste them on the little hearts; all on the same side.
    Step 5. Paste the big heart on the coloured cardboard. Paste the light lines on the heart and around it.
    Step 6. Cut long triangles from the sides of the rug, the 'flashy stripes'. Paste the rug on the black cardboard.
    Step 7. Paste the small hearts around the big heart; you may k de kleine hartjes rondom het grote hart, where you can go over the triangles. Outline the small hearts with a black marker.
    Step 8. Cut the black background away, leaving about 2 mm on the edges.
    Step 9. Paste the work on a coloured sheet (A4 size) and cut it into a square.
    Made by students of grade 4 and 5

    maandag 11 april 2016

    Funny houses like James Rizzi


    Made by Kalen, grade 4

    You need:
    1. white drawing sheet
    2. crayons 
    3. liquid watercolor paint
    4. brushes
    5. jars with water 
    James Rizzi was born in 1950 in Brooklyn. He studied art in Florida, where he started experimenting with printing, painting and sculpting. Rizzi’s work often shows his birthplace New York. His paintings look sometimes childishly naive, with the bright colors and brilliant gaiety. In the art press Rizzi is often described as "Urban Primitive Artist '. Rizzi himself says he is influenced by Picasso, Klee and Dubuffet.

    Made bij Jade, grade 4

    Show some paintings of Rizzi and discuss the characteristics:
    • bright colours
    • no gradations within colours
    • evertything is outlined with black
    • houses have human faces/characteristics
    • the artwork is full and busy
    • background is full too
    Students use a dark color crayon to draw a house in Rizzi style, a house with human characteristics like hair, mouth, eyes etc. 
    Paint with liquid water color paint.

    woensdag 27 januari 2016

    Valentine - like Robert Indiana


    Made by a student of grade 2

    You need:
    1. drawing sheet 20 by 20 cm
    2. water colour paint
    3. brushes
    4. fine black marker
    A lesson about the famous LOVE sculpture of Robert Indiana. I used the Dutch word LIEF (meaning Nice, or I like you) 
    Fold the sheet in four squares. Draw hearts in each part. Draw fat letters on the foreground. Fill letters and hearts with patterns and paint with water colour paint. Outline with fine black marker. 

    Blogwriter in NY!

    zaterdag 5 mei 2012

    Sunrise like Roy Lichtenstein

    A lesson is originally from Phyl's site, There's a dragon in my artroom. Check out her site for more!

    You need:
    1. drawing sheet A3 size
    2. tempera in red, blue, yellow, white and black
    3. brushes
    4. jar with water
    Roy Lichtenstein (1923 - 1997) was an American popart artist. He is best known for his enormously enlarged cartoons. After his art studies in New York and Columbus Liechtenstein teached art himself. In his spare time he painted abstract paintings and made parodies of American art from the twenties. In1960 he came into contact with Claes Oldenburg and the style elements from advertising and comic strips. He started to use use grids, dots, black outlines and bright colours, the style who made him famous. From 1962 Lichtenstein used the works of Monet, Picasso and Mondrian as the inspiration for his art and he paints sunsets in their style. Most of his work however is based on advertisements and cartoons.

    Show artwork of Liechtenstein on the digital board and discuss the characteristics: primary colours sometimes with green,  text balloons, raster dots as we know from newspaper photographs and thick black outlines. Show at the end the work 'Sunrise'. Ask students how they can recognize this work as a Lichtenstein.

    The students are instructed to paint a sunrise in the style of Lichtenstein. All Lichtenstein characteristics as discussed so, have to be seen in their painting.

    Artworks are made by students of grade 5

    vrijdag 20 augustus 2010

    Selfportrait in black and white

    You need:
    1. canvas
    2. digital photograph
    3. acrylic paint
    4. brushes
    5. carbon paper
    6. pen
    Show portraits made by Andy Warhol and discuss them. What is remarkable about those portraits? Would you recognize a Warhol? Why is that?
    To make this selfportrait each child needs a digital portrait of himself. Use a photo editor to make the photo black and white. I used Corel Paint Shop Pro. Choose for 'image' and then 'grayscale'. Then click on 'effects', choose 'artistic effects' and then 'posterize'. Choose for four or five layers.
    Print the photograph and trace it with a pen and carbon paper on a canvas. Paint the portrait with acrylic paint in greyscale. Paint the background in your choice of colours.

    maandag 5 april 2010

    Fruit and veggies in popart style

    Made by students of grade 6

    You need:

    1. piece of cardboard 9 by 9 cm
    2. drawing paper 20 by 29 cm
    3. colour pencils or markers
    4. fine black marker

    Draw a frame of 1 cm around the drawing sheet. Draw within this frame six squares of 9 by 9 cm, with 1 cm between the squares. Draw a cartoonlike piece of fruit or vegetables on the cardboard and cut it out. Trace it in the six squares. Colour the fruit or veggies with colour pencils or markers. To make the fruit pop out of the paper, the backgrounds have to be drawn with a fine black marker in different patterns in.

    donderdag 18 maart 2010

    Chickens like Andy Warhol

    You need:

    1. white drawing paper 21 by 14 cm
    2. markers
    3. piece of cardboard
    4. scissors
    5. pencil

    Tell about Andy Warhol and show some of his artwork. 

    Divide the sheet in six rectangles from 7 by 7 cm. Draw a chicken on cardboard and cut it out. Trace it six times. Colour everyting with markers in bright colours. Outline tall parts with a fine black marker. Draw legs and eyes.

    zondag 14 februari 2010

    Selfportrait in popart style

    By Milan, 12 years old
    You need:
    1. drawing paper A4 size
    2. picture of the child
    3. watercolour paint
    4. brushes
    5. wallpaper
    6. coloured paper for background
    7. scissors and glue
    8. black marker

      Print from photograph, made at Dumpr

    Make portraits of the children. Go to http://www.dumpr.net/ and click on 'photo to scetch'. Upload the pictures and print a drawing for every child.

    Show some drawings in the classroom. How do you recognize the student? What are the most important parts of the face? What lines are important? Every student gets his own drawing. The trace the most important lines in their drawing using a fine black marker. Do not trace details, because after this they have to trace with thick markers. This means: don't trace hairs, just the contours of them. Don't forget facial lines around the mound or nose. When tracing is ready, students take their drawing and a new drawing sheet to a window (or use lightboxes if you have these). Keep the drawing against the window with the white sheet one it and trace the drawing with a pencil. Go back to the table and look carefully at your own portrait. Is it you? Are the lines well? Are the eyes correct?

    Take a thick black marker and trace the pencil drawing. Paint the portrait with watercolour paint. Choose the colours you like; in popart every colour is possible!

    Paint a background or choose a wallpaper background and paste your cut portrait on it. Paste a coloured background behind it for strength.

    maandag 11 januari 2010

    Popart like Keith Haring


    You need:

    1. white drawing paper
    2. markers
    3. black construction paper
    Haring's works originated from the graffiti art and is distinguished by tight lines and the use of bright colours. Haring also worked iti with chalk on black painted plates and vases and statues. Haring has developed his own distinctive artistic language of symbols, symbols that almost look like icons.


    Show some works of Haring.. On http://www.haring.com/ you'll find everything.
    Discuss the distinctive features of the drawings of Haring: cartoon-like people, little details, often thick black lines and outlines, bright colors and little stripes to symbolize movement. Let the children create a drawing in the style of Haring. They have to omit many details as possible, and yet convey a certain feeling. Children have to remain a lahf centimeter of white around their drawing, just like Haring did. Paste the drawings on black construction paper and make sure the works are signed by the artists. On http://www.haringkids.com/ you'll find more than 80 lesson ideas about Keith Haring.

    All works of art are made by students of grade 6.

    zaterdag 23 mei 2009

    Printing with you hands

    With your hands you can make beautiful prints. You need:
    1. black tempera
    2. glass plate
    3. paint roller
    4. sheets A4 size in different colours
    5. glue and scissors
    Put some black paint on a glass plate. Roll the paint well, till the glass is covered. Put your hand in the paint and press firmly. Put your black hand on a sheet of coloured paper and make a print. Make four prints on four different colour sheets. Maybe you have to make even more, because some of them won't succeed. Never mind, choose the best ones after printing! Cut your prints after drying with 1 cm extra around the paint. Stick all prints on different colour paper and you have a beautiful artwork in the style of Andy Warhol!