Posts tonen met het label houses. Alle posts tonen

vrijdag 18 maart 2022

Circle City


You need: 

  1. white drawing sheet
  2. compass
  3. ruler
  4. pencil
  5. markers
  6. colored sheet
  7. glue

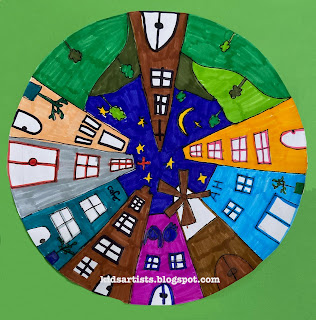
Explain the one-point perspective: objects that are further away appear smaller. If we draw a street towards the horizon, it narrows and trees get smaller. 

In one-point perspective you draw all lines parallel to the viewing direction to one point. You literally put a dot on the horizon. 

What to do? 

  • Draw a circle of 20 cm in diameter using the compass. Mark the hole in the center with a dot.  
  • Draw lines form the edges of the circle to the dot in the middle, using ruler and pencil. 
  • Draw buildings in different heights using the lines.  Draw doors and windows. 
  • Color with markers. Outline everything with a fine black marker. 
  • Cut the circle and stick it on a colored sheet. 

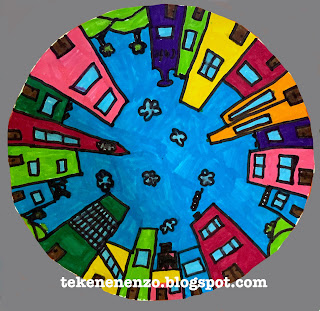
Art work made by students of grade 4. 

maandag 2 augustus 2021

Dutch canal houses: indian ink and soft pastels


You need: 

  1. drawing sheets
  2. pencil
  3. ruler
  4. indian ink
  5. dip pen
  6. soft pastels
Dutch canal houses are famous for their facades: stepped gable, neck gable, bell gable, clock gable or spout gable. Show pictures of those five gables and discuss them. Show photographs from canal houses and discuss the other features of canal houses: the stairs, symmetry, windows, ornaments, shutters. 
Students draw a line on their sheet about 5 cm from below. This is the canal. At the end you can glue all drawings together to get a long street full of canal houses. Sketch the houses lightly with a grey pencil. Indicate the places of windows, stairs, doors and shutters. Draw small boats in the canal. Draw the houses with indian ink and color them with soft pastels.

by students of grade  6

woensdag 5 december 2018

Happy new year!

Made by students of grade 6
You need:
  1. white drawing sheet A3 size
  2. water paint color
  3. brushes
  4. liquid water color paint
  5. crayons
Draw some Dutch canal houses and color them with water color paint. Use crayons to draw fireworks. Then paint the sky dark blue with liquid water color leaving  the edges white. 

maandag 11 april 2016

Funny houses like James Rizzi


Made by Kalen, grade 4

You need:
  1. white drawing sheet
  2. crayons 
  3. liquid watercolor paint
  4. brushes
  5. jars with water 
James Rizzi was born in 1950 in Brooklyn. He studied art in Florida, where he started experimenting with printing, painting and sculpting. Rizzi’s work often shows his birthplace New York. His paintings look sometimes childishly naive, with the bright colors and brilliant gaiety. In the art press Rizzi is often described as "Urban Primitive Artist '. Rizzi himself says he is influenced by Picasso, Klee and Dubuffet.

Made bij Jade, grade 4

Show some paintings of Rizzi and discuss the characteristics:
  • bright colours
  • no gradations within colours
  • evertything is outlined with black
  • houses have human faces/characteristics
  • the artwork is full and busy
  • background is full too
Students use a dark color crayon to draw a house in Rizzi style, a house with human characteristics like hair, mouth, eyes etc. 
Paint with liquid water color paint.

vrijdag 8 april 2016

The sky is the limit

Golden Gate Bridge, made by Elize, grade 6

You need:
  1. grey paper A4 size
  2. white and black pencils
  3. pictures of famous skylines
During a visit to the Museum in The Hague, I saw an artwork that Escher had made on gray paper. The only colours he had used were black and white. Together with the gray, you do have a lot of colours at your disposal. The Escher drawing I saw then, was the inspiration for this lesson.


Show photos of some famous skylines. Discuss skylines, skyscrapers and remarkable buildings. Ask children to search a skyline on the internet. Print this in black and white and then copy it so you can see the shadows of the buildings (settings light - dark on copyer). Students draw with just white and black pencil on the grey sheet.

Sydney skyline by Adnan, grade 6

dinsdag 1 oktober 2013

One colour city - group work like Alisa Burke

You need:
  1. drawing sheet A1 size
  2. drawing sheets 10 by 20 cm (A4 size cut in three) 
  3. various colouring materials: crayons, oilpastel, colour pencils, watercolour paint, markers, tempera etc. 
  4. fine black marker 
  5. liquid water colour paint 
  6. big brush
  7. scissors
  8. glue
An artwork I came across on Pinterest from Alisa Burke was the inspirations for this lesson. Show Burke's work and discuss it: all houses in the same colour, windows are white, everything is outlined with black marker, houses uizen hebben één kleur, de ramen zijn wit, alles is zwart omrand, the houses aren't just next to each other but behind each other and (overlap). That means you cannot see the bottom of the houses that are not on the first row. 

Students form groups of four and discuss together the colour they'll choose. One of the students paints the background: use white crayon to draw stars or clouds and then paint the entire sheet with with liquid watercolor. Leave about one inch white along the edges.

On the smaller sheets students draw high houses, with windows and doors and decorations. Colour with the material of you choice. Outline the house and windows with black fineliner and cut it out. Be sure the group draw together about 15 houses.
Lay the painted houses on the large sheet to get a beautiful collage. Note that you do not see undersides of the houses that are not in the front row.

Made by students of grade 5/6

maandag 17 juni 2013

Castle and Sun, like Paul Klee


Artworks are made by students of grade 4
You need:
  1. printed drawing sheet 
  2. crayons
  3. watercolour paint 
  4. brushes
  5. jars with water
On the Italian art blog  Arteascuola from Miriam Paternoster, I came across this terrific art lesson about Paul Klee. Be sure to visit Miriam's blog, it's great!

Paul Klee (1879 – 1940) is a German/Swiss painter. His work belongs to modern art. Klee developed mainly as an autodidact and left more than 9000 artworks. In 1912 he saw the work of Picasso and Malevich and met Robert Delaunay, who believed colour is the most important element in a painting. After a trip to Tunisia in 1914 Klee started to paint more colorful and abstract. He painted landscapes, portraits, animals, mythology, mysterious machines. In his work he combined abstract and figurative shapes. Klee 's work cannot be described in one single word. Surrealism, cubism, abstraction are terms which are applicable to his paintings. He is classified by expressionism. (Source: Wikipedia)

Print any text on drawing sheets or choose an old book page. I had chosen the Wikipedia page about Paul Klee. Show Klee's artwork 'Castle and sun' and discuss the characteristics: Klee used just squares, rectangles and triangles. What colors are used?

The students use a crayon in a color that contrasts with the watercolor paint (sharp point to make thin lines) and draw a frame around the text. Then they draw a building consisting only of rectangles, squares and triangles. Do not use a ruler, because the text provides sufficient support.
Paint with watercolour. Choose cold or warm colors. Do not allow the same colour next to each together.

maandag 27 mei 2013

Houses - like Ton Schulten

Made by a studenty of grade3

You need:
  1. drawing sheet A4 size
  2. tempera paint in red, yellow, blue and black
  3. brushes
  4. jar with water
  5. pencil 
  6. ruler
Ton Schulten (1938) is a Dutch painter living in Ootmarsum. After his work as a graphic designer, he decides in 1989 to try to make a living as a painter. His main inspiration is the open landscape of Twente (a part of Holland):  an open landscape divided in parts by hedges and hedgerows, looking like a stage with curtains.

Painting like Ton Schulten in lower classes can be done, but you have to keep it simple. Show artworks from Ton Schulten and discuss them.
  • his use of colours  
  • the 'curtains' on the sides
  • simple shapes
  • divided in rectangles
The students divide the sheet of drawing paper in 24 squares (4 by 6). With the primary colours yellow, red and blue and the mixed colours, they paint the squares. Each colour may be used just three times. If the work is dry, paint simple houses across the dividing lines with a small brush and black paint.

donderdag 13 december 2012

Happy new year


Made by students of grade 3 and 4 

You need: 
  1. white drawing sheet A4 size
  2. blue liquid water colour paint 
  3. brush
  4. crayons
  5. black and yellow or orange construction paper
  6. yellow chalk pastel
Show pictures or movies about fireworks and discuss what this looks like. Use crayons to draw fireworks on a white sheet. Paint this with blue liquid water colour paint. Let dry.
Cut a skyline out of half a sheet of black paper. Paste this on the blue sheet. Cut windows from yellow or orange paper.
Draw a yellow chalk line on the roofs and smudge it.   

maandag 19 november 2012

Colourful city


You need:
  1. white drawing sheet A4 size
  2. pencil
  3. colour markers
  4. black fine marker
What kind of lines do you know? Straight, zigzag, wavy, spiral, edgy etc.
Draw on the upper half of the sheet six different lines from left to right. Draw on the lower half a lot of different overlapping  houses. Start with the front row. Be sure to vary in width and heighth and draw several kinds of roofs.

Choose seven colours. Colour the spaces between the six lines each with a different colour. Use the same colours for the houses of the city. Outline everything with a fine black marker.

Made by a students of grade 5

zondag 16 september 2012

Under the rainbow

Made by a student of grade 5

You need:
  1. white drawing sheet 25 by34 cm
  2. black marker
  3. tempera paint
  4. brush
  5. scissors
  6. glue
I found this idea on Pinterest. It's origanally from a teacher from Estonia.
Paint coloured stripes or circles at the top of a white sheet. Let dry. Draw contours of houses on a second sheet of paper with thin pencil lines. Ensure overlap. 'Colour' these houses with different patterns in black marker. Don't outline the houses; the surfaces should be recognizable by the different patterns.
Make the row of houses as wide as the painted sheet. Cut the row of houses and paste it on the painted paper.

dinsdag 1 mei 2012

Lighthouses along the coast


You need:
  1. drawing sheet A6 size (postcard)
  2. watercolour paint
  3. brushes
  4. jar with water
  5. scissors and glue
What are lighthouses? Where can you find them and why there? Why did we need them, and do we still need them?
Show pictures of lighthouses on the digital board and discuss them. What does a lighthouse look like? What colour is often used? Where is the lamp of the lighthouse? Where's the door?

For the background students paint with watercolour paint a simplified landscape of air and soil. The paint should be dilluted with a lot of water to get soft colours. The sheet doesn't need to be painted completely, it is even better to leave the edges white. Put this painting aside to dry.

Then sketch a lighthouse on a second sheet of paper. Paint it with watercolour paint, using less water now to be sure the colours really stand out.
Let the work dry and cut the lighthouse. Paste it on the painted background.
Made by students of grade 3

dinsdag 6 december 2011

House in cubist style

By a student of grade 4

You need:
  1. drawing paper A4 size
  2. colour markers
  3. pencil
  4. ruler
Draw a house simplified house with windows and a door. Add one or two trees. Divide the sheet in with three horizontal and three vertical lines. Colour the surfaces with four different coloured markers.

zaterdag 26 november 2011

Amsterdam by night

You need:
  1. white drawing sheet A4 size
  2. liquid water colour
  3. brush
  4. jar with water
  5. indian ink
  6. straw
  7. black and yellow construction paper
  8. scissors
  9. glue
Paint the white sheet blue or orange with liquid water colour; add water to get a brighter blue / orange above. Let dry. Drip some indian ink and blow it upwards with a straw. Cut a row of canal houses out of black paper and paste it on the coloured sheet. Cut and paste windows and a moon out of yellow paper.
Paste the artwork on a black sheet.
Artworks made by students of grade 4

zaterdag 8 oktober 2011

Haunted house in the moonlight

Made by a student of grade 6
You need:
  1. white drawing sheet A4 size 
  2. black construction paper
  3. yellow chalk pastel
  4. scissors
  5. cutting knife
  6. lijm
  7. white pencil
  8. black marker
  9. blue and purple tempera paint
  10. sauzer
  11. sponge
This lesson is all about Halloween and haunted houses. First make a word web about haunted houses: skeletons, spiders, bats, old, tombstones, dark, scary, etc.

Tear a strip of black paper from about 5 cm and paste it on the bottom of the white sheet: the ground. Draw on black paper ahouse that looks old and cut it out.


Use a cutter for doors and windows. Paste the house on the white sheet. Draw details such as bricks, ghosts, spiders, webs with a white pencil. Use a black marker to draw things in the white window openings.
Cut a circle, the moon, from a scrap of paper and lay it on the work. Outline moon and house with a yellow chalk pastel and smudge the chalk outwards. 


Use a sponge piece to stamp the background with purple and blue tempera paint. Do not get too close to the yellow chalk. Finally paste the artwork on a yellow background sheet.

maandag 26 september 2011

Dutch canal houses groupwork

Part of the groupwork, made by students of grade 4

You need:
  1. white drawing sheets
  2. tempera paint
  3. brushes
  4. pencil
  5. glue plakkaatverf
After a request of Amy Baldwin, art teacher in Millington, my 4th graders painted Dutch canal houses for the Empty Bowl fundraiser in Millington (Mi).
Before starting to paint, we talked about the Dutch Golden Age, a period roughly spanning the 17th century, in which Dutch trade, science and art were among the most acclaimed in the world. In this century many of the typical canal houses were built, in that age used as store houses. We looked at pictures of canal houses, discussed the different kinds of gables (neck gable, trep gable, bell gable) and details of the houses (windows, year it was built, stairs).

Every students gets a sheet of paper and has to draw a line on 8 cm of the bottom - this is for the canal. On the left side of the sheet there must remain a white strip of 2 cm (to paste all paintings together).
Every student draws his own canal house. Stop drawing after 5 minutes, to avoid drawint to many details. Paint the house with tempera paint. Mix colours, or for even better results: take two colours of paint on your brush and mix a little while painting.


Paste all paintings together to make a long street. Paint the canal. You might even add the words  'Groeten uit Holland'!

Click to see full site.

zaterdag 19 maart 2011

Fairy tale caste

Made by students of grade 4

You need:
  1. white drawing sheet A4 size
  2. indian ink
  3. dip pen
  4. watercolour paint
  5. brushes
  6. jar with water

See some pictures of castles and talk about the several parts: battlements, high thick walls, drawbridge, towers, schietgaten, portcullis etc. Talk about the location of a castle: often a high point, so oversee the area. Show that many castles were surrounded by a moat and discuss why this was.

Students draw their castle directly with indian ink on ther sheet. Add details like shutters, torches or flags. Draw the background, the surrounding of the castle. Colour the drawing with watercolour paint. The combination of indian ink and watercolour paint will give a perfect aged feeling.

dinsdag 30 november 2010

Cityscape at night

You need:

  1. black construction paper 20 by 20 cm
  2. oil pastel
  3. white tempera paint
  4. some drops of dishwashing detergent
  5. brush
Students draw the outline of simple houses on black paper. Behind the high ones, in the front the lower ones. Colour the houses with oil pastel. Draw and colour a behind the houses. Mix some drops of dishwashing detergent with tempera paint. This keeps the paint to stick to the oily chalk. Outline the houses and moon with the white paint. Finally paint windows and doors.

zaterdag 27 november 2010

Dutch December skyline

You need:

  1. black construction paper 20 by 20 cm
  2. chalk pastel
  3. coloured pencils
  4. white sheet A4 size for stencil
Draw a skyline with roofs of Dutch canal houses on the white sheet. Cut it. Choose a colour to stencil with. Rub chalk on the stencil. Use a tissue or your finger to rub the chalk off the stencil on the black sheet, to create the soft looking skyline. Turn the stencil and take another colour to repeat this process. Students may also exchange the roof with your neighbour, to get different skylines. Draw a moon with chalk pastel. Draw windows in the houses and colour them with a yellow and/or white pencil.

vrijdag 26 november 2010

Paper bag city

Made by a student of grade 2

You need:
  1. white drawing sheets A3 size
  2. tempera paint in blue, white and black
  3. brown paper bag
  4. scissors and glue
  5. brushes
Torn some typical city center buildings in various forms out of brown paper bags. Paste them on a white sheet. In front of the high buildings we see smaller ones (overlap). Paint a blue or grey blue sky on the sheet. Use different colours of blue and grey. Outline the buildings with black tempera paint. Paint windows and doors. Hang all artworks together to create a long street.