zondag 29 mei 2011

Sailboat regatta

You need:
  1. two sheets of white drawing paper
  2. sandpaper
  3. tempera paint in blue, green and white
  4. brush
  5. coloured paper
  6. brown paper (grocery bag)
  7. glue
  8. blue paper A1 size
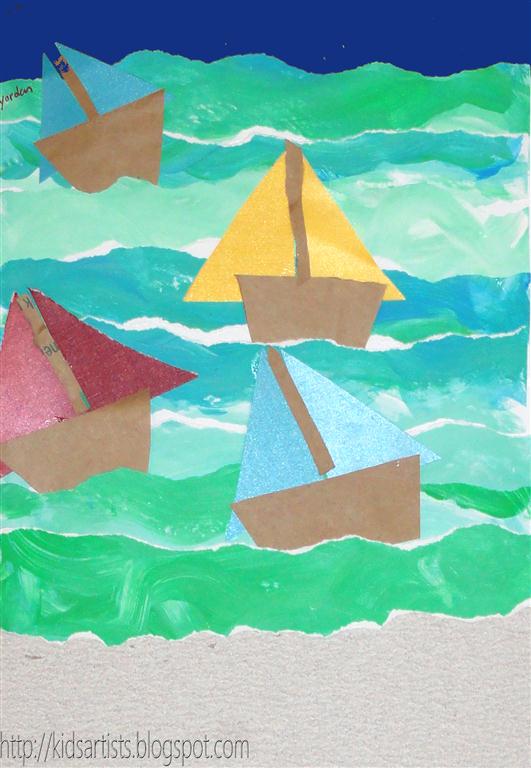
Spray paint stripes in blue, green and white on a saucer. Lay a sheet of white drawing paper before you, with the small size up. Paint it with coloured waves. Don't mix the colours on the saucer, but dip the brush in two or three colours. Leave the sheet to dry.
Take the second white sheet and lay it before you with the small side up. Cut a piece of sandpaper as wide as the sheet and 8 cm high. Paste the sandpaper on the bottom of the sheet.
Tear the painted sheet in wavy strips. Tear the straight sides of the first and last strip too, so that all strips have two wavy sides. 
Place the strips overlapping on the white sheet. Start below. Place the second strip partly under the first one, the third under the second etc. Paste down the short sides of the waves on the left and right.
Cut boats out of a brown paper bag; bigger ones below, smaller ones at the top (perspective). Cut masts out of the paper bag and sails out of coloured paper. Paste the boats between the waves and paste the long sides of the waves at the same time. Paste sails and masts on the boats.  
Paste or staple all works together on large blue sheets (A1 size) to create a beautiful group work.

Artworks made by students of grade 4

maandag 23 mei 2011

Filled with fruit

Made by a student of grade 3

You need:
  1. white drawing sheet A4 size
  2. oil pastels
Choose four fruits and draw many of them on the drawing sheet. The fruit should overlap. Colour them with oil pastels and outline with black.

dinsdag 17 mei 2011

Wavy weaving

Made by students of grade 3

You need:
  1. paper strips in two colours, 4 x about 50 cm
  2. black cardbaord
  3. scissors
  4. glue
  5. printed grid of 5 by 5 squares, each square is 4 by 4 cm

1. Give all students the printed grid. Cut it along the outside and paste it on black cardboard.

2. Cut 10 stripes in two colours, 4 x 50 cm. Fold the ends of the strips about one cm.

3. Paste the fold edges exactly along the lines of the squares. Use two different colours alternately. Paste the arcs from bottom to top and from left to right, alternately. Cut a piece of the strip if it's too long. You may paste small squares to the ends of the rows as a finishing touch.
 
5. Press the strips gently and your weaving will look great!

vrijdag 13 mei 2011

MOMA

Made by Debbie, grade 6
You need:
  1. drawing sheet A4 size
  2. colour pencils
  3. ruler
A lesson about drawing one point perspective.

Students draw a square in the middle of their sheet and draw four lines from the corners to the middle, see schedule. These are the floor and ceiling lines. Draw two lines from both short sides to the middle. Between these two lines the paintings has to be drawn. Draw lines from the bottom to the middle for tiles or parquet.
It's nice to draw artworks that students have made this schoolyear or to choose for artworks of famous painters.
Colour with colour pencils.

zaterdag 7 mei 2011

Puzzle drawing

Made by students of grade 5
You need:
  1. white drawing sheet A4 size
  2. markers
  3. black construction paper
  4. glue
Students draw organic shapes on a white sheet and colour them with markers. Then all shapes have to be cut out and pasted with a little space between them on a piece of black construction paper. Be sure to lay down the cut pieces directly on the right place, to avoid hours of puzzling!


donderdag 5 mei 2011

Three spring flowers, three materials

 
Made by students of grade 3

You need:
  1. three white drawing sheets 10 by 10 cm
  2. coloured origami sheets 12 by 12 cm
  3. coloured cardboard 14 by 38 cm
  4. tempera paint
  5. brushes
  6. crayons
  7. colour pencils
  8. tulips, daffodils, bluebonnets or pictures of them
  9. glue
Students scetch three different spring flowers on three sheets of 10 by 10 cm: bluebonnet, tulip and daffodil. Colour the flowers with three different materials: crayons, tempera paint and colour pencils. Paste the drawings on coloured origami sheets and paste them then on coloured cardboard.

maandag 2 mei 2011

Painting while listening to classical music

By Marrit (gr. 6, right part) and Luuk (gr. 1, left part)
You need: 
  1.  cd's with classical music
  2. cd-players
  3. drawing sheet A2 size
  4. brushes
  5. tempera paint
  6. jar with water
During a school project about music, students of grade 1 and 6 painted together while listening to classical music. We had five classrooms to work in. In every classroom was a cd-player with classical music: Bolero of Ravel, Four Seasons of Vivaldi, the Carneval of the Animals of Camille Saint-SaĆ«ns and two more. On the tables big sheets, paint and brushes.

Every first grader came to the sixth graders and asked a student to work with. Each pair was sent to a classroom where they listened to a piece of classical music. By talking together, 'What do you think of while hearing this?' 'What do you feel?' students had to make a painting. One student on the right side, the other on the left side of the sheet. It wasn't nesessary to make one painting, but they might do it. I was all about interpretation of the music.
Marrit (left, grade 6) and Luuk (grade 1) working together on their fishbowls

Students made great artworks together. Some worked together to make one painting, like the one above: two fishbowls, painted while listening to the Four Seasons - Spring of Vivaldi. It is clear the right bowl is painted by the grade 6 student. Other couples chose to paint tow different interpretations, as you can see below.
A great project, worth to give it a try!